从零开始的后台管理系统(2)
发布于 2020-07-08 修改于 2020-07-14 从零开始的后台管理 java springboot
本章前提
- 了解logback
- 了解swagger
- 了解xss攻击
- 了解druid
- 了解mybatis
本章内容
代码
日志配置、全局异常捕获、swagger配置、xss过滤、druid与mybatis配置。
基本目录创建
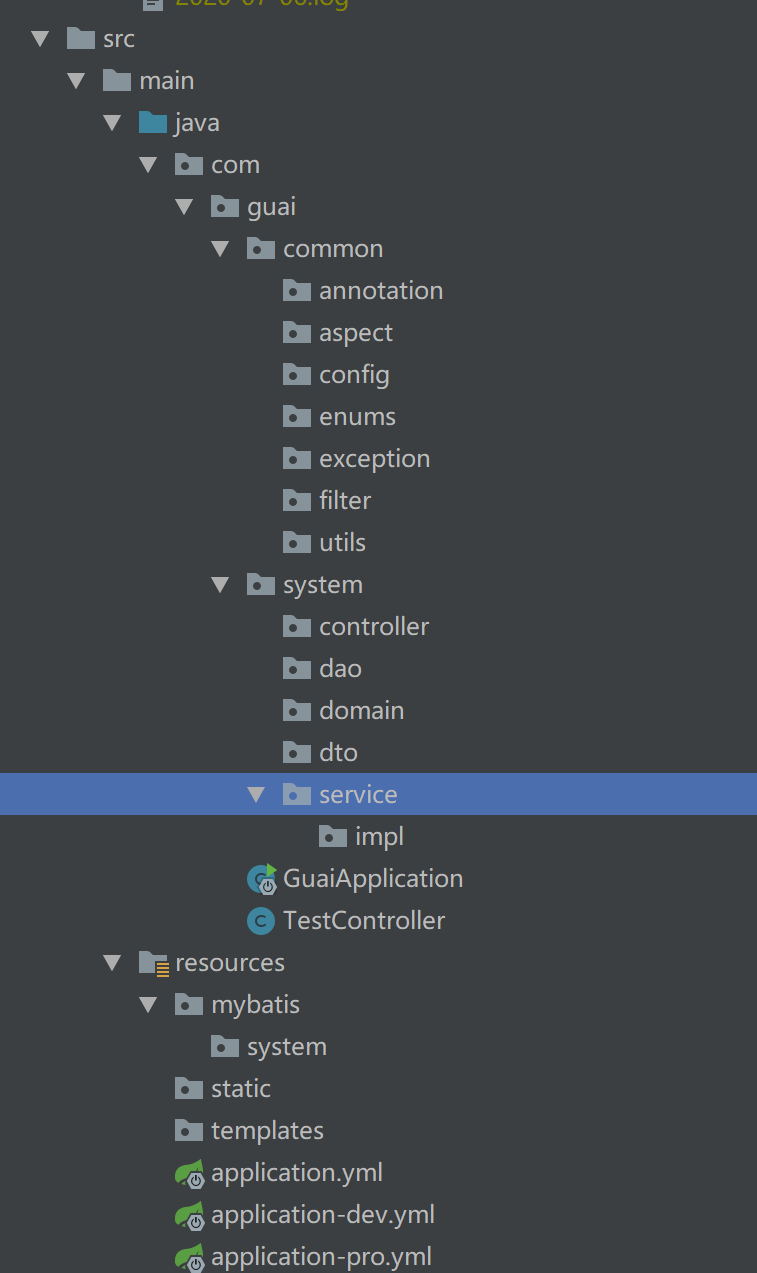
各个包名就是字面上的意思。还有的是,application.yml为配置文件,与application.properties,个人偏好于.yml格式的文件。
日志
springboot默认使用logback日志。
基本配置
在resources下创建logback-spring.xml。logback-spring.xml会自动被springboot加载。1
2
3
4
5
6
7
8
9
10
11
12
13
14
15
16
17
18
19
20
21
22
23
24
25
26
27
28
29
30
31
32
<configuration debug="false">
<appender name="console" class="ch.qos.logback.core.ConsoleAppender">
<encoder class="ch.qos.logback.classic.encoder.PatternLayoutEncoder">
<!--格式化输出:%d表示日期,%thread表示线程名,%-5level:级别从左显示5个字符宽度,%logger{50}:logger名字长度50,%msg:日志消息,%n是换行符-->
<pattern>%d{HH:mm:ss} [%thread] %-5level %logger{50} - %msg%n</pattern>
<!--设置编码-->
<charset>UTF-8</charset>
</encoder>
</appender>
<appender name="file" class="ch.qos.logback.core.rolling.RollingFileAppender">
<rollingPolicy class="ch.qos.logback.core.rolling.TimeBasedRollingPolicy">
<!-- 文件名格式 -->
<FileNamePattern>
log/%d{yyyy-MM-dd}/%d{yyyy-MM-dd}.log
</FileNamePattern>
</rollingPolicy>
<layout class="ch.qos.logback.classic.PatternLayout">
<Pattern>
%d{yyyy-MM-dd HH:mm:ss} -%msg%n
</Pattern>
</layout>
</appender>
<!-- com.guai下的打印是DEBUG -->
<logger name="com.guai" level="DEBUG" />
<!-- INFO级别打印 -->
<root level="INFO">
<appender-ref ref="console"/>
<appender-ref ref="file" />
</root>
</configuration>
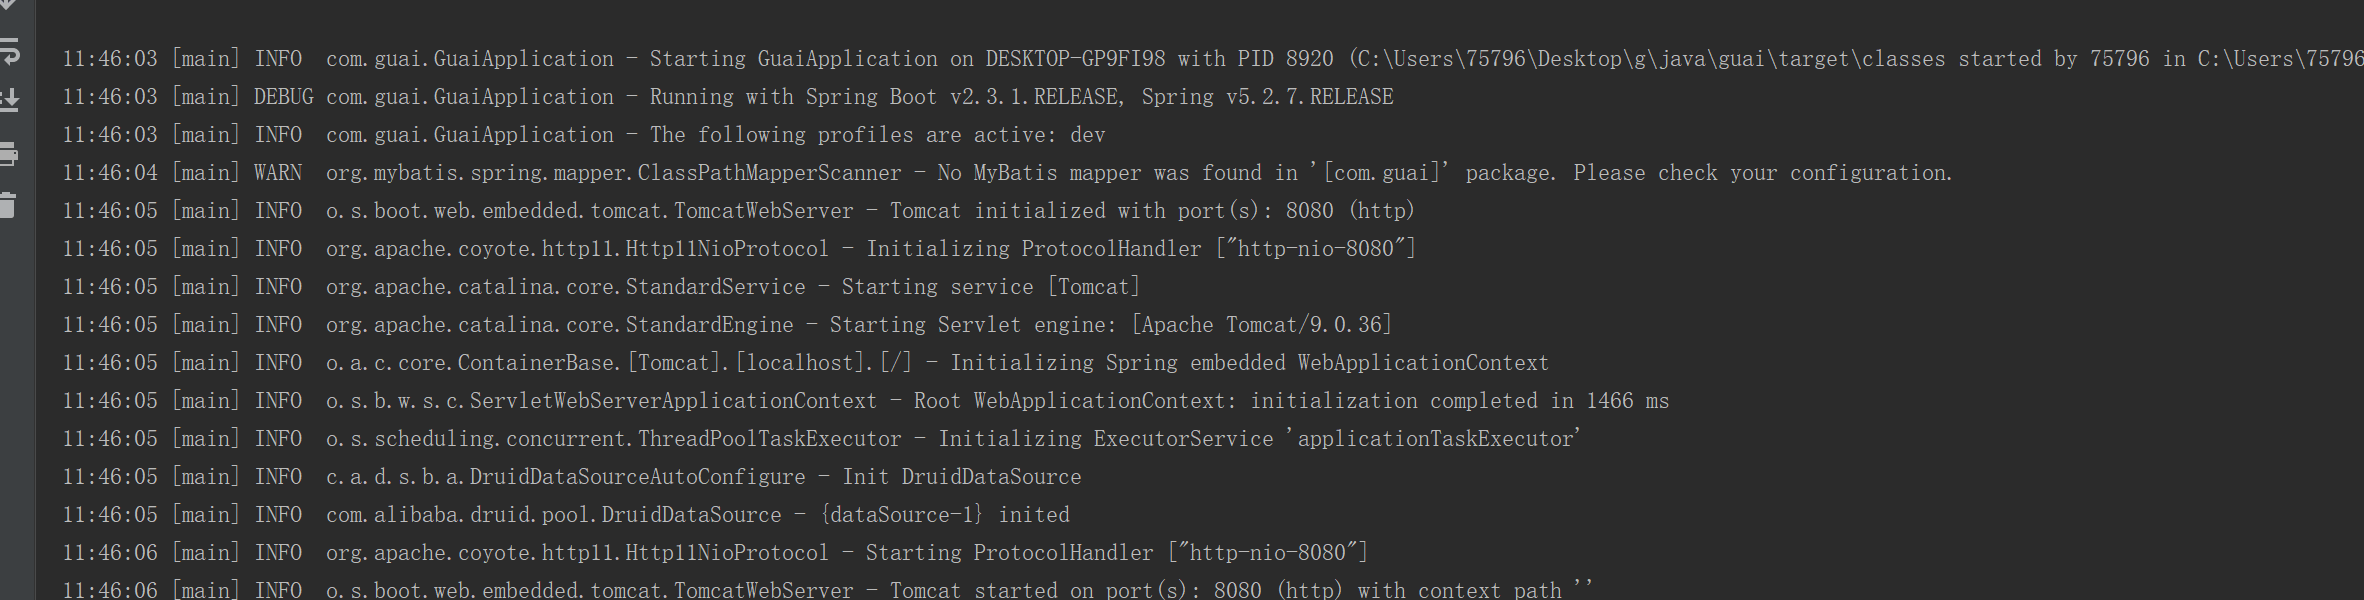
配置好后,启动项目后会按照配置文件里的格式打印日志,最后也会生成日志文件。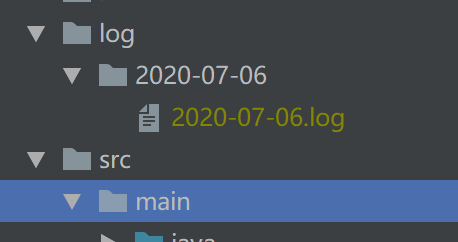
响应信息主体
添加pom依赖
1 | <!--lombok--> |
定义返回状态码枚举
在com.guai.common.enums下创建ResultEnum.java。1
2
3
4
5
6
7
8
9
10
11
12
13
14
public enum ResultEnum {
SUCCESS(0,"成功"),
FAIL(1,"失败"),
;
private int code ;
private String message;
ResultEnum(int code,String message){
this.code=code;
this.message=message;
}
}
其中的状态码code可以自定义。
封装响应消息主体
在com.guai.common.utils下创建R.java。1
2
3
4
5
6
7
8
9
10
11
12
13
14
15
16
17
18
19
20
21
22
23
24
25
26
27
28
29
30
31
32
33
34
35
36
37
38
39
40
41
42
43
44
45
46
47
48
49
50
51
52
53
54
55
56
57
58
59
60
61
62
63
64
65
public class R<T> implements Serializable {
private static final long serialVersionUID = 1L;
private int code;
private String message;
private T data;
public R(){
this(ResultEnum.SUCCESS,"success");
}
public R(T t){
this(ResultEnum.SUCCESS,"success",t);
}
public R(ResultEnum e, String message){
this(e,message,null);
}
public R(ResultEnum e ,String message,T data){
this.code = e.getCode();
this.data = data;
this.message= message;
}
public static <T> R ok(){
return new R();
}
public static <T> R ok(T data){
return new R(data);
}
public static <T> R oke(String message){
return new R(ResultEnum.SUCCESS,message);
}
public static <T> R error(){
return new R(ResultEnum.FAIL,"error");
}
public static <T> R error(String message){
return new R(ResultEnum.FAIL,message);
}
public static <T> R error(T data){
return new R(ResultEnum.FAIL,"error",data);
}
public static <T> R error(String message,T data){
return new R(ResultEnum.FAIL,message,data);
}
public static <T> R result(ResultEnum e,String message){
return new R(e,message);
}
public static <T> R result(ResultEnum e,String message,T data){
return new R(e,message,data);
}
}
虽然上面定义了很多方法,但实际常用的就ok()、ok(T data)、error()。
测试
在TestController.java中添加新的接口。1
2
3
4("/r")
public R r(String some){
return R.ok(some);
}
启动服务访问接口http://localhost:8080/r?some=abcd。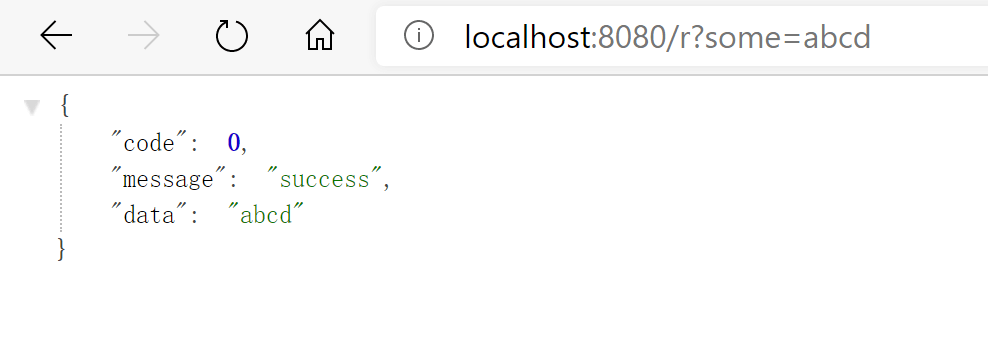
全局异常捕获
在com.guai.common.exception下创建GlobalExceptionHandler.java。1
2
3
4
5
6
7
8
9
10
public class GlobalExceptionHandler {
private static final Logger LOG = LoggerFactory.getLogger(GlobalExceptionHandler.class);
(Exception.class)
public R handleException(Exception e) {
LOG.error(e.getMessage(), e);
return R.error(e.getMessage());
}
}
在TestController.java中添加新的接口。1
2
3
4("ex")
public R r() throws Exception {
throw new Exception("错误信息");
}
重启服务访问接口http://localhost:8080/ex。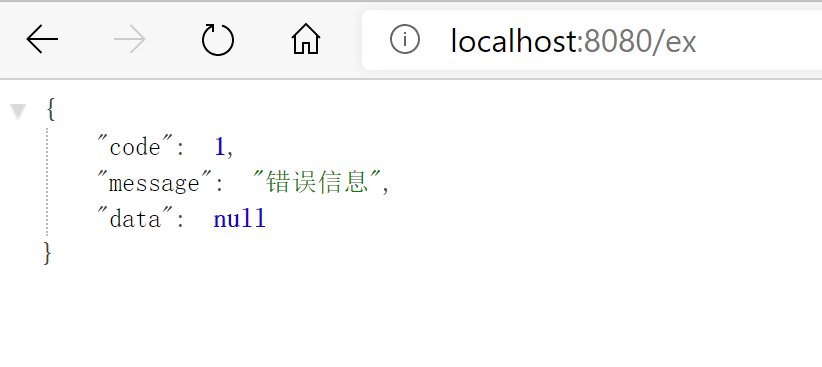
在访问一个不存在的接口时,springboot有自己默认的处理页,如下。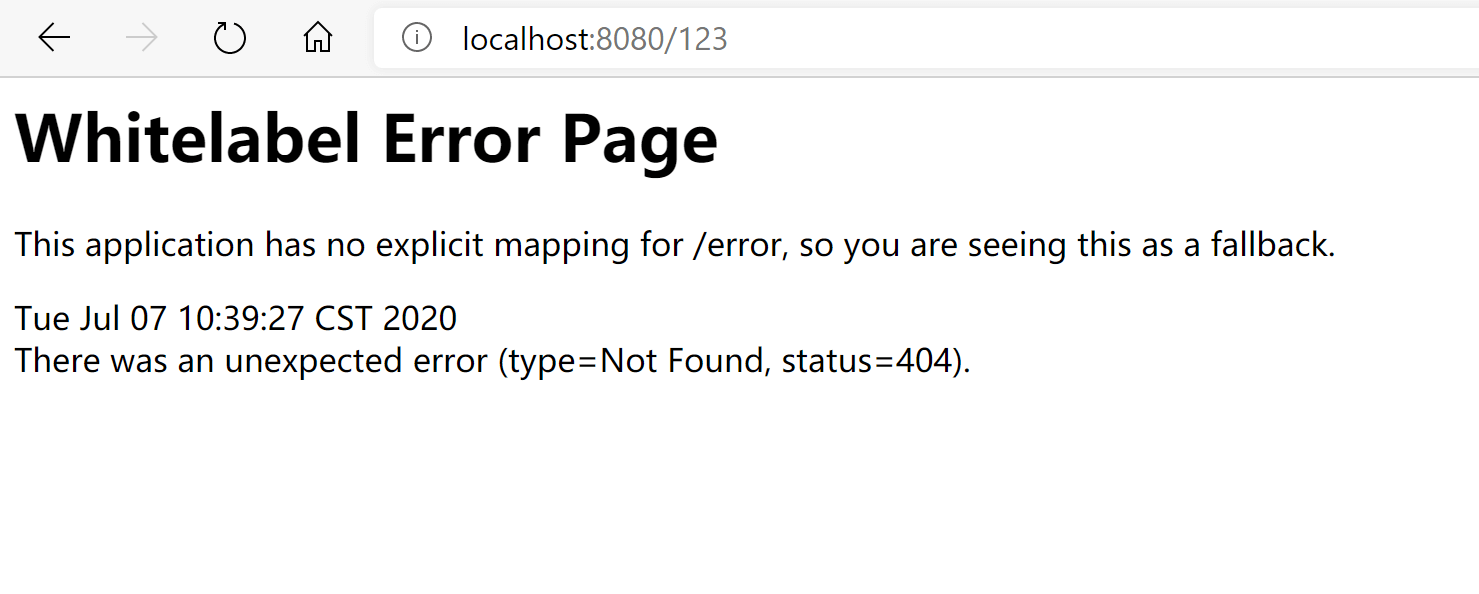
这个目前是无法被全局异常捕获,要做以下修改。
在application.yml中添加1
2
3
4
5spring:
mvc:
throw-exception-if-no-handler-found: true
resources:
add-mappings: false
这个添加之后,异常就可以捕获到了。
为了与Exception.class区分,在GlobalExceptionHandler中添加NoHandlerFoundException.class的异常捕获。1
2
3
4
5
6(NoHandlerFoundException.class)
public R handlerNoFoundException(Exception e)
{
LOG.error(e.getMessage(), e);
return R.error("路径不存在");
}
再次访问不存在的接口。
有一个注意事项,添加spring.mvc.throw-exception-if-no-handler-found=true与spring.resources.add-mappings=false之后,项目中的静态文件访问将会出问题,在下面使用swagger的时候会有解决方案。
api文档
swagger
添加pom依赖
1 | <dependency> |
添加配置
在com.guai.common.config下创建Swagger2Config。1
2
3
4
5
6
7
8
9
10
11
12
13
14
15
16
17
18
19
20
21
22
23
24
25
26
27
28
292
public class Swagger2Config {
public Docket createRestApi() {
return new Docket(DocumentationType.SWAGGER_2)
.apiInfo(apiInfo())
.select()
//为当前包路径
.apis(RequestHandlerSelectors.any())
.paths(Predicates.not(PathSelectors.regex("/error.*")))// 错误路径不监控
.paths(PathSelectors.any())
.build();
}
//构建 api文档的详细信息函数
private ApiInfo apiInfo() {
return new ApiInfoBuilder()
//页面标题
.title("功能测试")
//创建人
.contact(new Contact("小怪", "http://blog.lsiru.com", "gqiwei163@.com"))
//版本号
.version("1.0")
//描述
.description("API 描述")
.build();
}
}
因为swagger页面是静态文件,之前又做全局异常捕获,要做下处理。在com.guai.common.config下创建ResourcesConfig。1
2
3
4
5
6
7
8
9
10
public class ResourcesConfig implements WebMvcConfigurer {
public void addResourceHandlers(ResourceHandlerRegistry registry)
{
/** swagger配置 */
registry.addResourceHandler("swagger-ui.html").addResourceLocations("classpath:/META-INF/resources/");
registry.addResourceHandler("/webjars/**").addResourceLocations("classpath:/META-INF/resources/webjars/");
}
}
简单测试
启动服务器,访问http://localhost:8080/swagger-ui.html。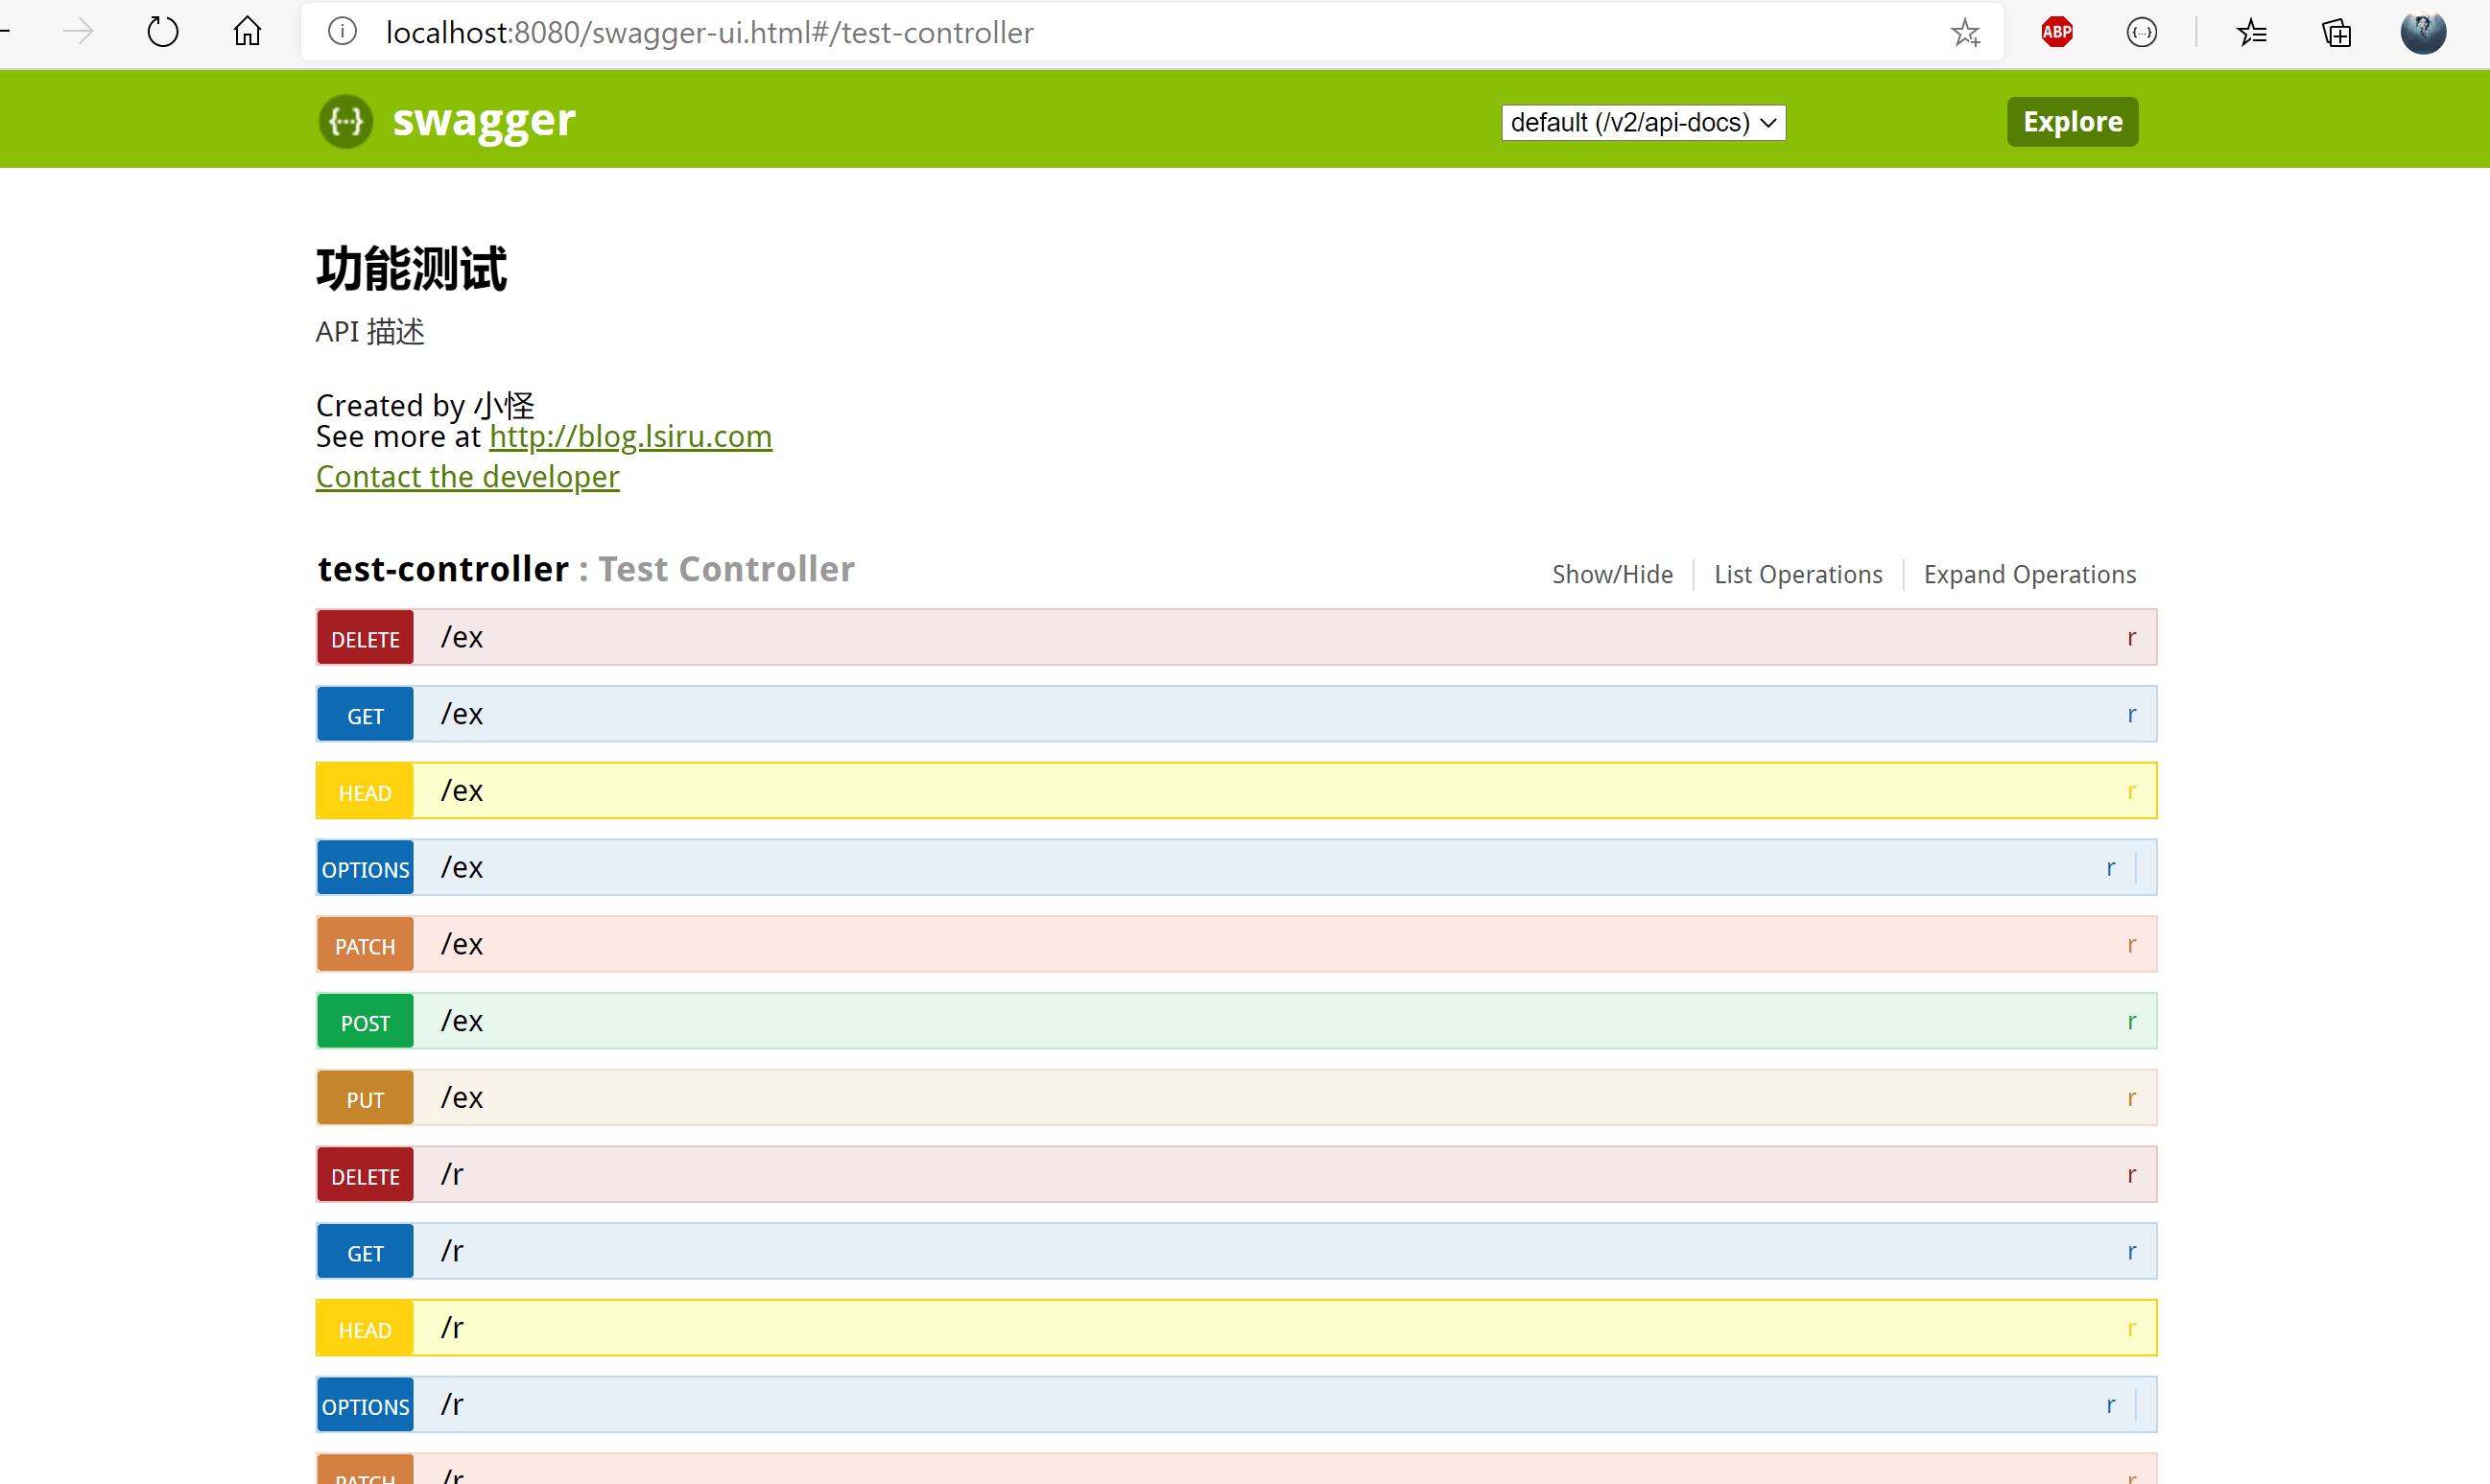
之所以有这么多个接口,是因为我们使用了@RequestMapping()注解,会加载所有的method。规定method之后就会只存在你设置的method,如@RequestMapping(value ="/xxx",method = RequestMethod.POST)、@PostMapping("/xxx")。
UI
使用swagger自己的页面,觉得太丑,不好用,可以使用另一个ui——swagger-bootstrap-ui。
添加依赖
1 | <dependency> |
修改ResourcesConfig
在addResourceHandlers(ResourceHandlerRegistry registry)里添加registry.addResourceHandler("doc.html").addResourceLocations("classpath:/META-INF/resources/");。
简单测试
启动服务器,访问http://localhost:8080/doc.html。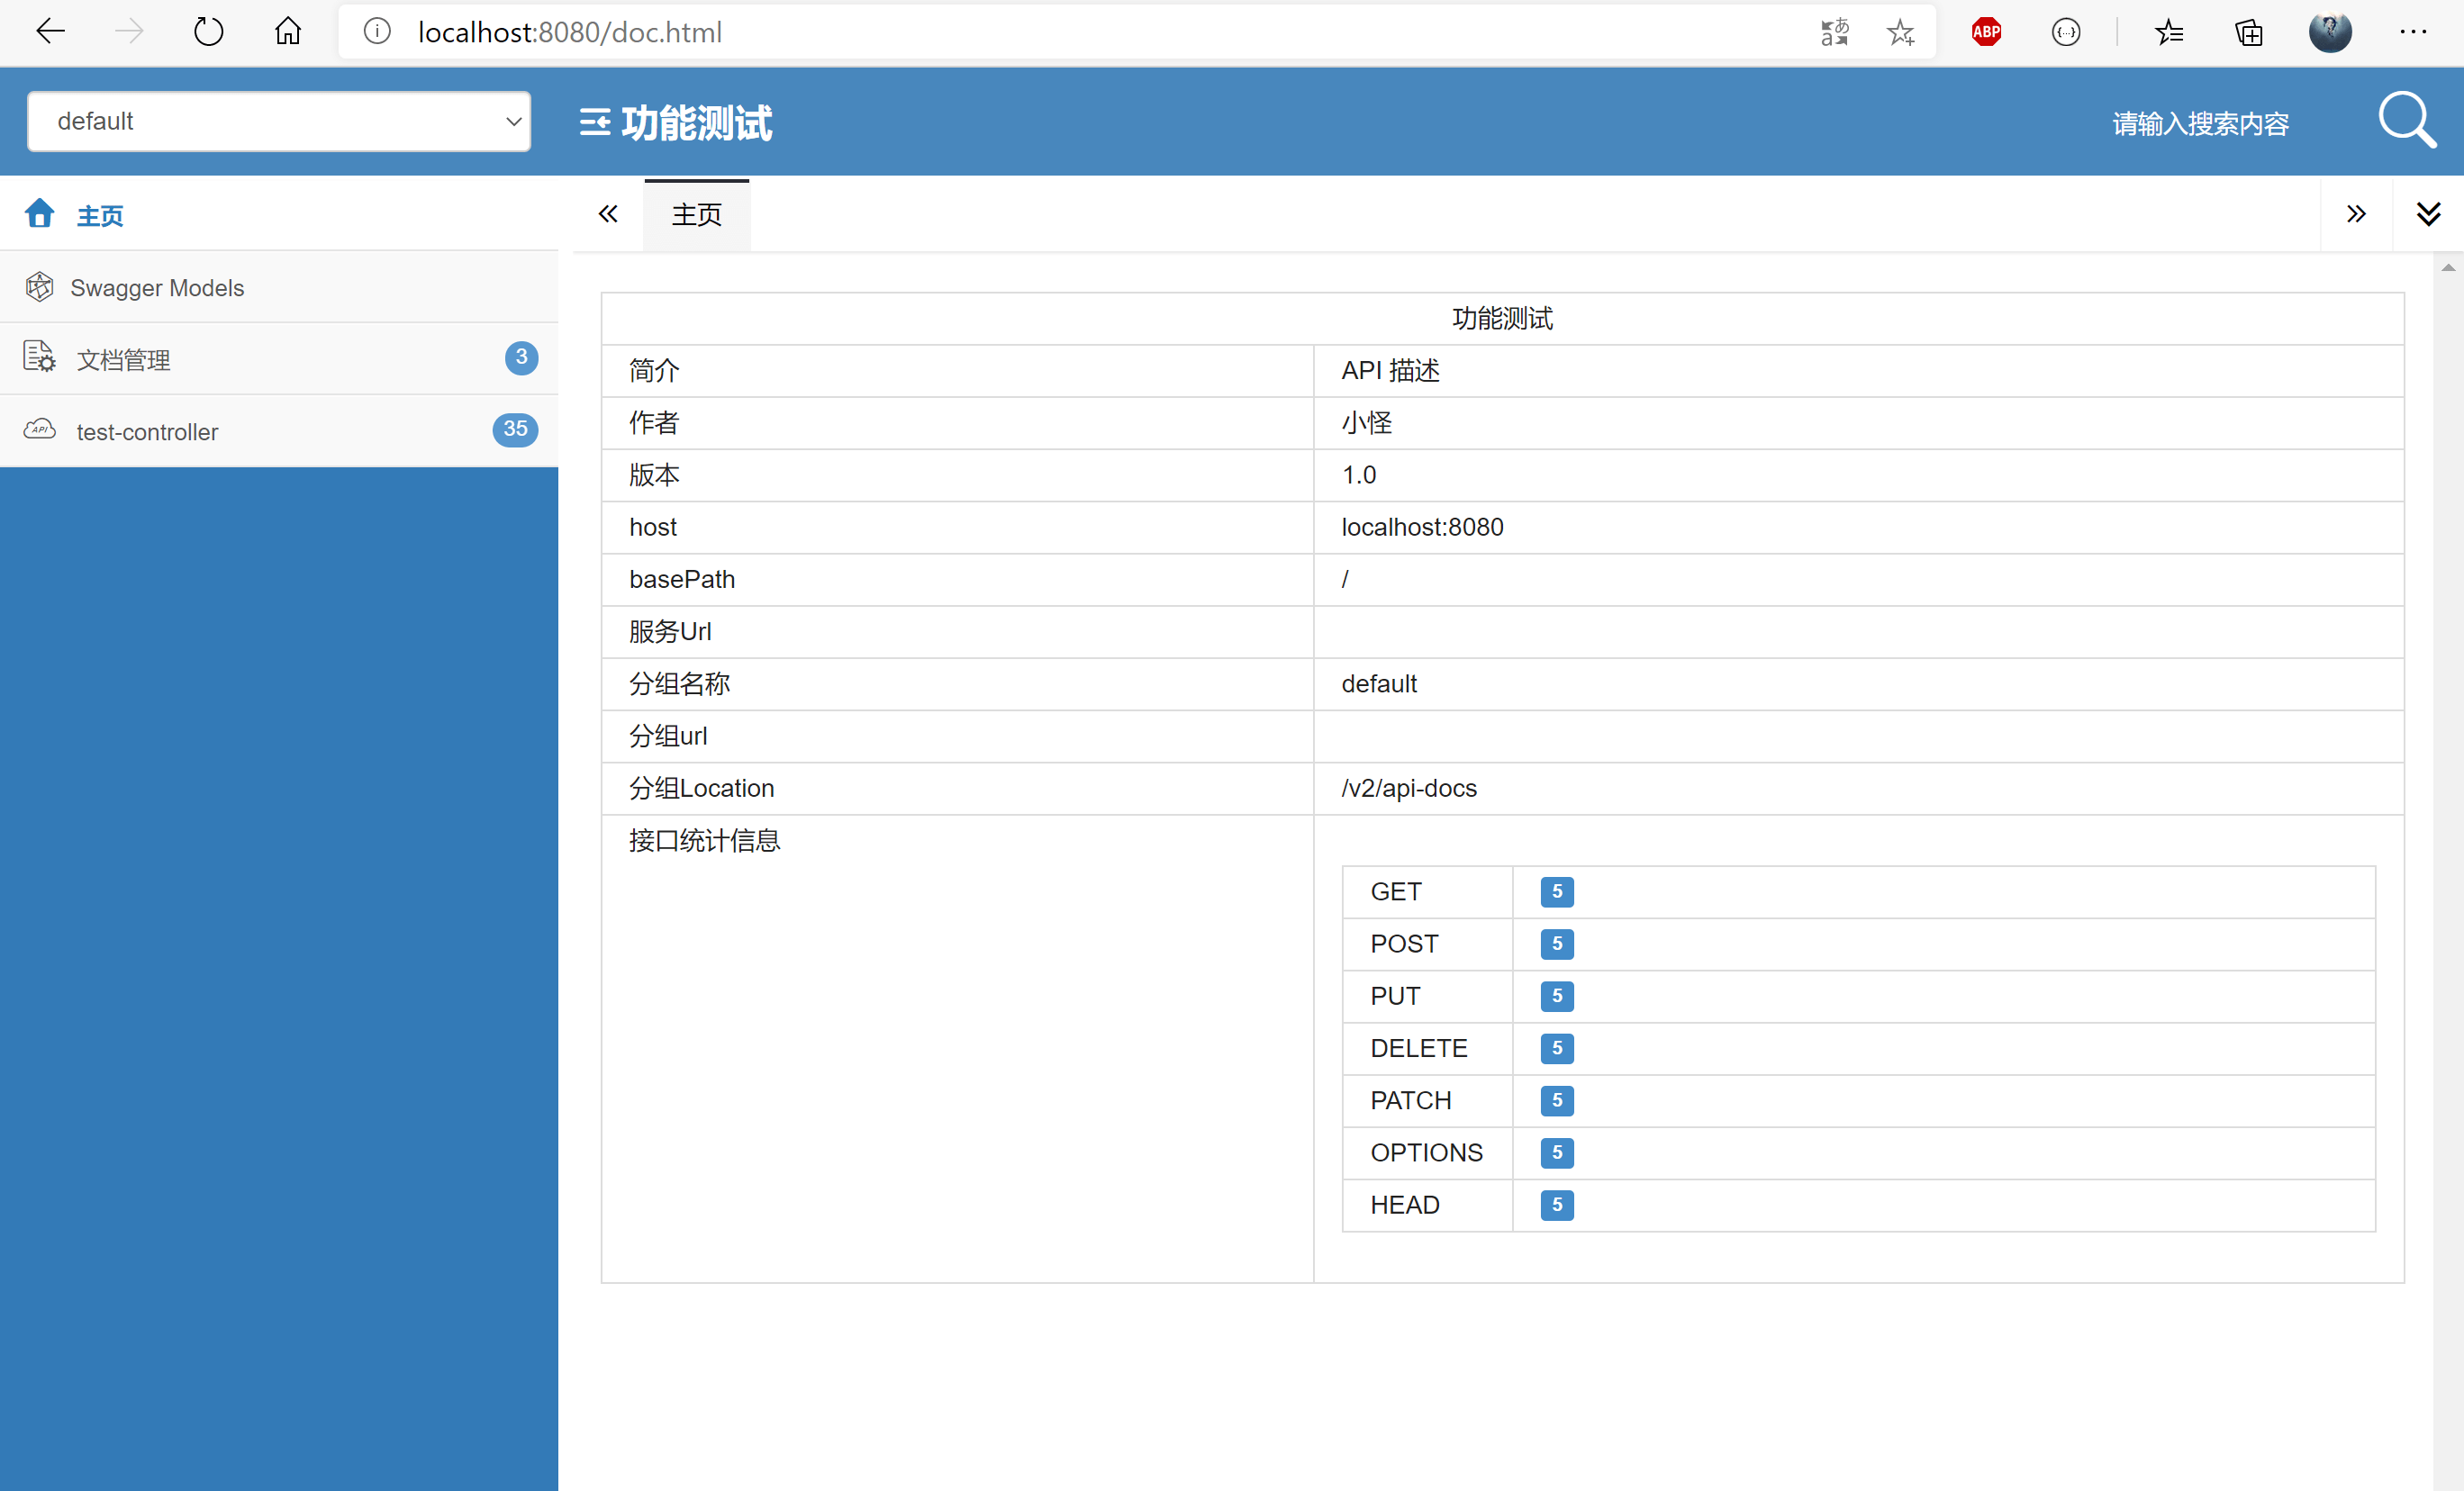
测试
后续会采用swagger-bootstrap-ui,故swagger-ui在之后篇章中会被删除。
给R.java添加注解
1 |
|
创建TestDO
1 |
|
修改TestController
1 | (value = "测试内容",tags="测试") |
启动服务器,访问http://localhost:8080/doc.html,查看swagger接口测试,参数所有备注都能查看。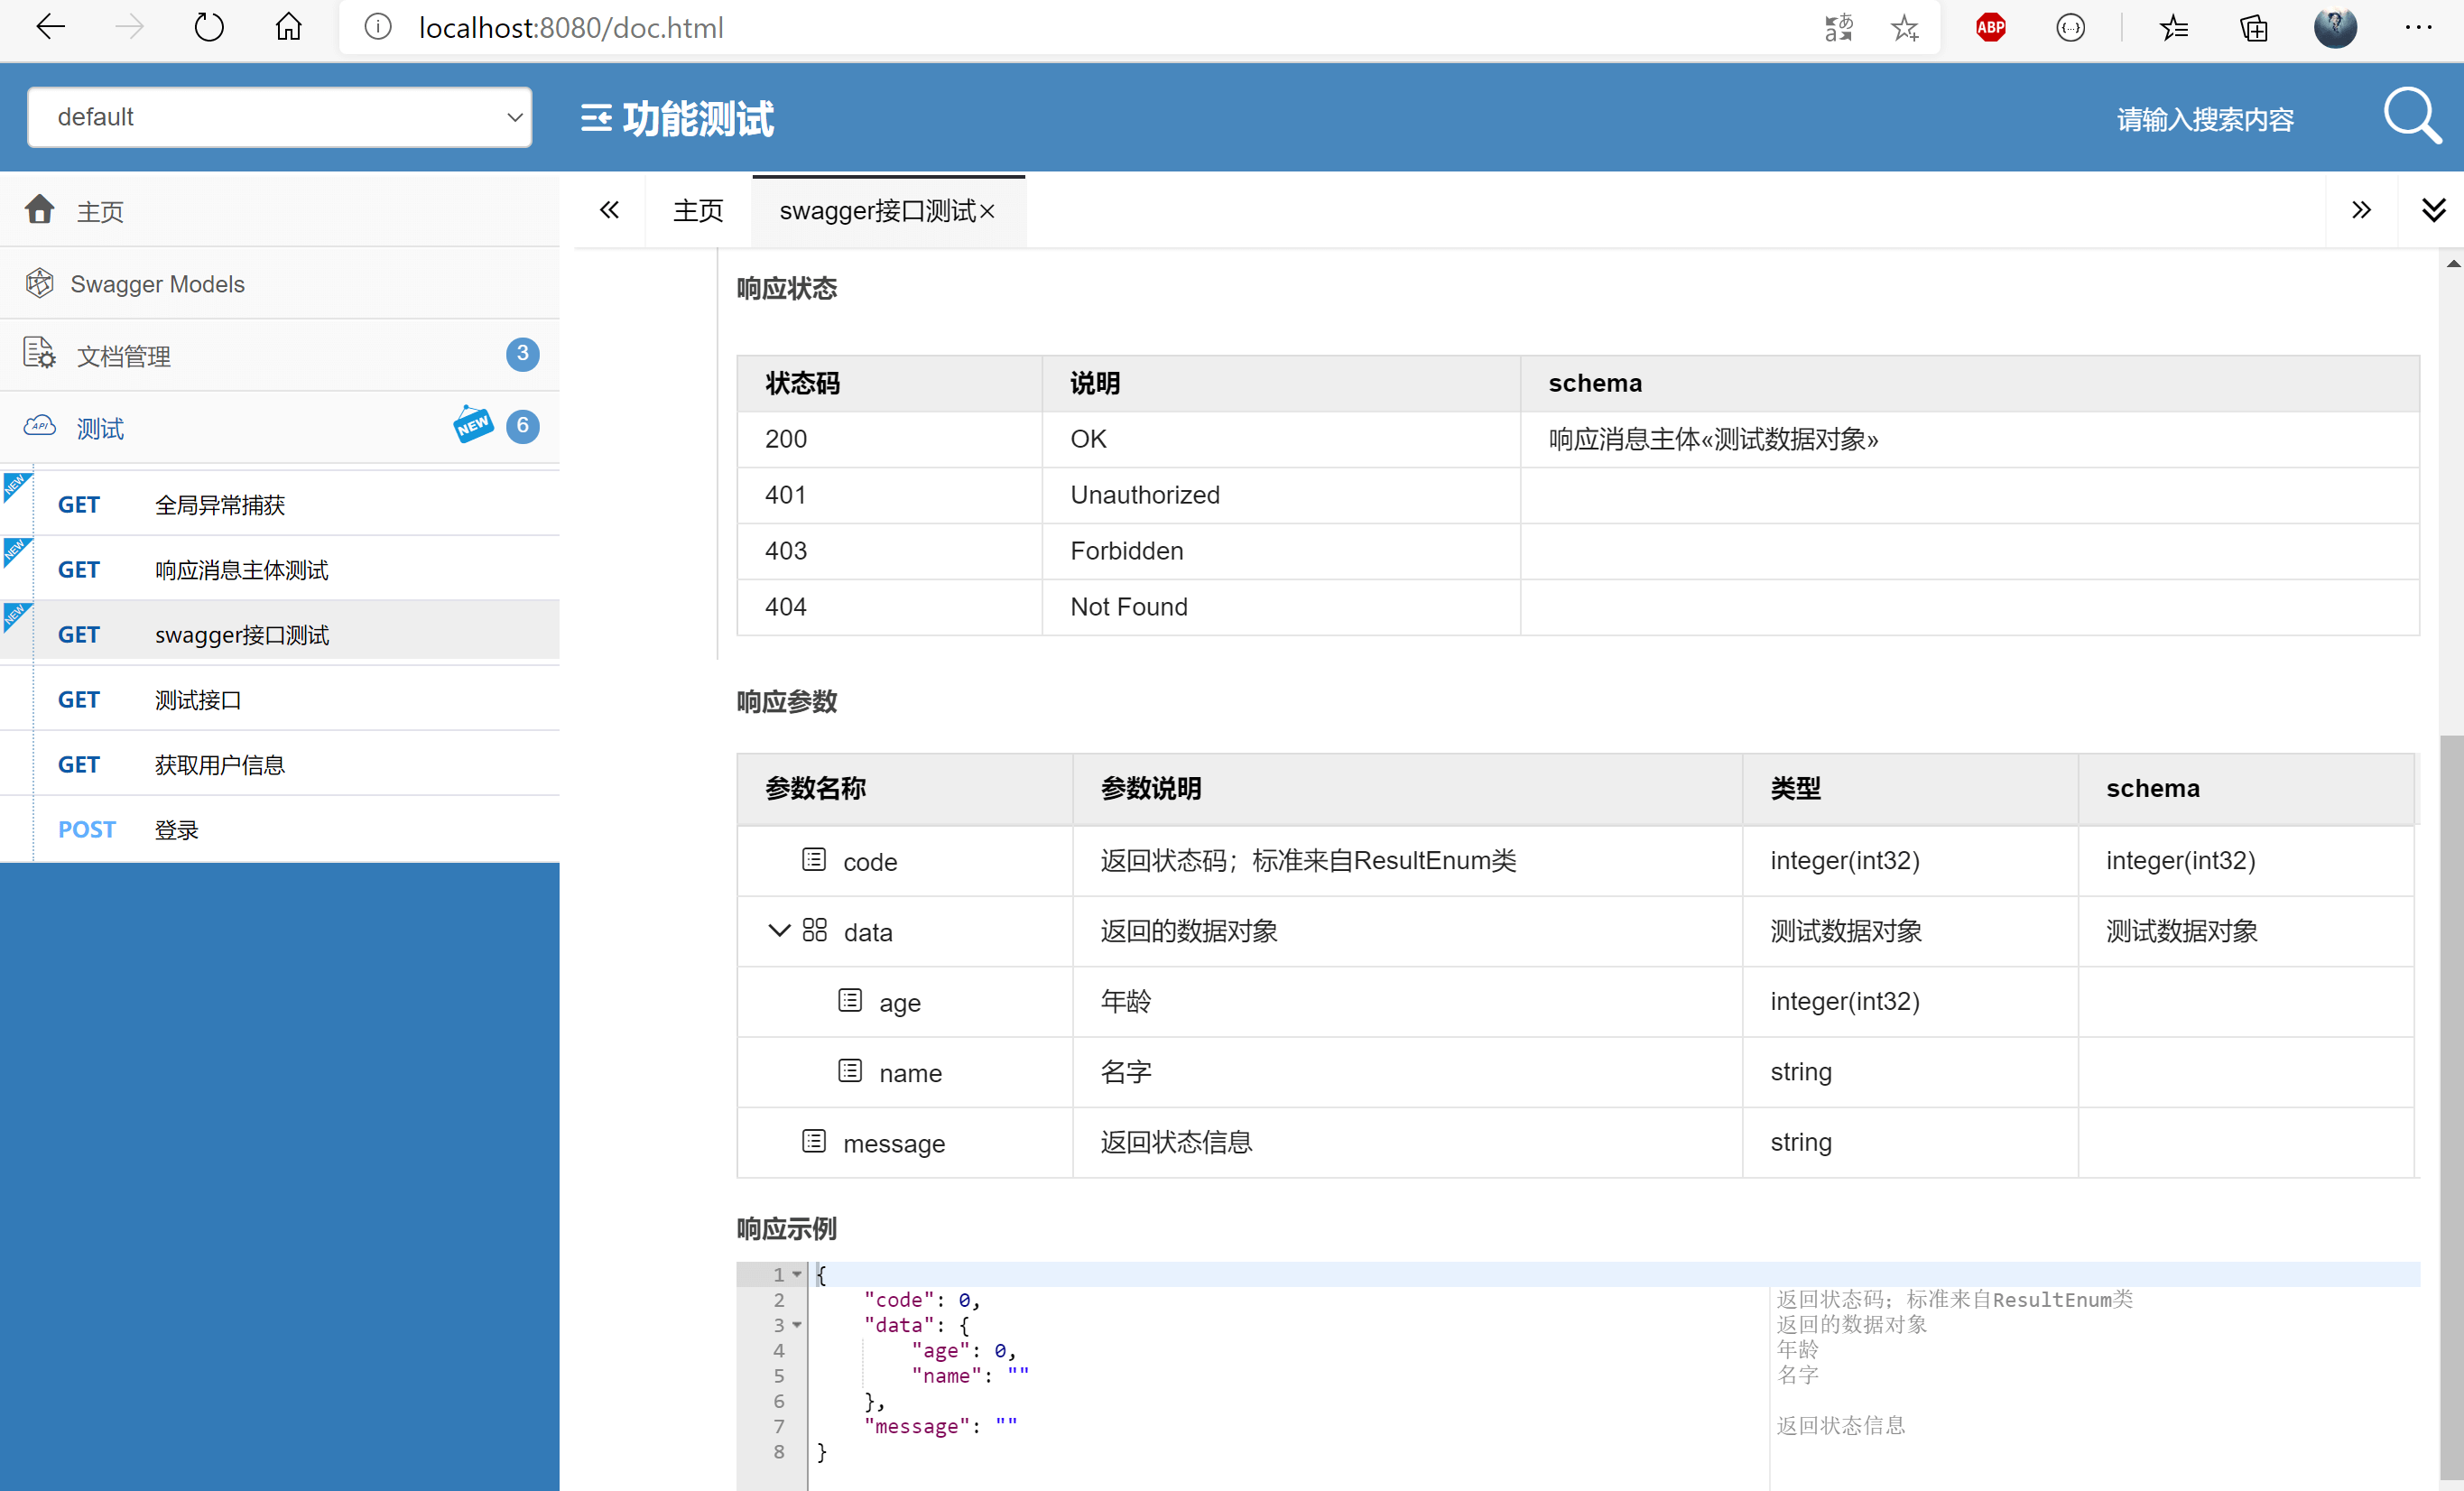
添加xss过滤器
xss过滤器主要处理请求中的html代码,防止xss攻击,这里采用Jsoup来处理。
代码编写
添加pom依赖
1 | <dependency> |
创建JsoupUtil.java
在com.guai.common.utils下创建JsoupUtil.java,主要是处理html。代码如下:1
2
3
4
5
6
7
8
9
10
11
12
13
14
15
16
17
18
19public class JsoupUtil {
/**
* 使用自带的 basicWithImages 白名单
* 允许的便签有 a,b,blockquote,br,cite,code,dd,dl,dt,em,i,li,ol,p,pre,q,small,span,strike,strong,sub,sup,u,ul,img
* 以及 a 标签的 href,img 标签的 src,align,alt,height,width,title 属性
*/
private static final Whitelist whitelist = Whitelist.basicWithImages();
/** 配置过滤化参数, 不对代码进行格式化 */
private static final Document.OutputSettings outputSettings = new Document.OutputSettings().prettyPrint(false);
static {
// 富文本编辑时一些样式是使用 style 来进行实现的
// 比如红色字体 style="color:red;"
// 所以需要给所有标签添加 style 属性
whitelist.addAttributes(":all", "style");
}
public static String clean(String content) {
return Jsoup.clean(content, "", whitelist, outputSettings);
}
}
创建XssHttpServletRequestWrapper.java
在com.guai.common.filter下创建XssHttpServletRequestWrapper.java。1
2
3
4
5
6
7
8
9
10
11
12
13
14
15
16
17
18
19
20
21
22
23
24
25
26
27
28
29
30
31
32
33
34
35
36
37public class XssHttpServletRequestWrapper extends HttpServletRequestWrapper {
public XssHttpServletRequestWrapper(HttpServletRequest request) {
super(request);
}
public String getParameter(String name) {
name = JsoupUtil.clean(name);
String value = super.getParameter(name);
if (StringUtils.isNotBlank(value)) {
value = JsoupUtil.clean(value);
}
return value;
}
public String[] getParameterValues(String name) {
String[] arr = super.getParameterValues(name);
if(arr != null){
for (int i=0;i<arr.length;i++) {
arr[i] = JsoupUtil.clean(arr[i]);
}
}
return arr;
}
public String getHeader(String name) {
name = JsoupUtil.clean(name);
String value = super.getHeader(name);
if (StringUtils.isNotBlank(value)) {
value = JsoupUtil.clean(value);
}
return value;
}
}
重写getParameter(String name)、getParameterValues(String name)、getHeader(String name),将请求参数全都做xss过滤。
创建XssFilter.java
在com.guai.common.filter下创建XssFilter.java。1
2
3
4
5
6
7
8
9
10
11
12
13
14
15
16
17
18
19
20
21
22
23
24
25
26
27
28
29
30
31
32
33
34
35
36
37
38
39
40
41
42
43
44
45
46
47
48
49
50
51
52
53
54
55
56public class XssFilter implements Filter {
public List<String> excludes = new ArrayList<String>();
public void init(FilterConfig filterConfig) throws ServletException {
String temp = filterConfig.getInitParameter("excludes");
if(temp != null){
String[] url = temp.split(",");
for(int i=0;url!=null && i<url.length;i++){
if(!"".equals(url[i])){
excludes.add(url[i]); //添加白名单
}
}
}
}
public void doFilter(ServletRequest servletRequest, ServletResponse servletResponse, FilterChain filterChain) throws IOException, ServletException {
HttpServletRequest request = (HttpServletRequest) servletRequest;
HttpServletResponse response = (HttpServletResponse) servletResponse;
if(handleExcludeURL(request,response)){
filterChain.doFilter(request,response);
return ;
}
XssHttpServletRequestWrapper xssRequest = new XssHttpServletRequestWrapper(request);
filterChain.doFilter(xssRequest,response);
}
/**
* 判断连接是否在白名单里
* @param request
* @param response
* @return
*/
public boolean handleExcludeURL(HttpServletRequest request, HttpServletResponse response){
if(excludes.isEmpty()||excludes ==null){
return false;
}
String url = request.getServletPath();
for(String pattern : excludes){
Pattern p = Pattern.compile("^"+pattern);
Matcher m = p.matcher(url);
if(m.find()){
return true;
}
}
return false;
}
public void destroy() {
}
}
创建FilterConfig.java
在com.guai.common.config下创建FilterConfig.java。1
2
3
4
5
6
7
8
9
10
11
12
13
14
15
16
17
18
19
public class FilterConfig {
public FilterRegistrationBean xssFilterRegistrationBean(){
FilterRegistrationBean filterRegistrationBean = new FilterRegistrationBean();
filterRegistrationBean.setFilter(new XssFilter());
filterRegistrationBean.setOrder(1);//优先级 越小代表优先级越高
filterRegistrationBean.setEnabled(true);//是否开启
filterRegistrationBean.addUrlPatterns("/*");
Map<String,String> initParameters = new HashMap<String,String>();
initParameters.put("excludes","");//白名单, 多个以逗号相隔
filterRegistrationBean.setInitParameters(initParameters);
return filterRegistrationBean;
}
}
至此xss过滤器就已经处理完了,接下来就是测试了。
测试
TestController.java中添加接口。1
2
3
4("xss")
public R xss(String url){
return R.ok(url);
}
启动服务器,然后在浏览器中访问http://localhost:8080/xss?url=<script>alert(1)</script>测试。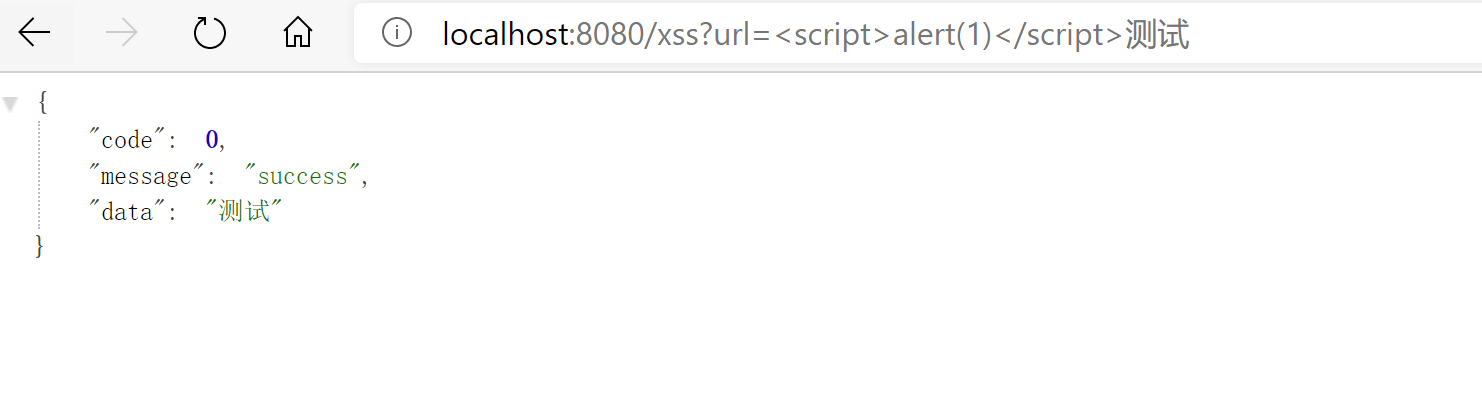
xss过滤成功。对于xss攻击,完全可以自己视情况在XssHttpServletRequestWrapper.java中自定义处理方式。
数据库连接
添加pom依赖
1 | <!-- druid --> |
连接池druid配置
druid是Java语言中最好的数据库连接池。提供强大的监控和扩展功能。
配置文件
在application.yml中添加1
2
3
4#读取application-dev.yml 配置文件 测试环境dev、生产环境pro
spring:
profiles:
active: dev
在application-dev.yml中添加1
2
3
4
5
6
7
8
9
10
11
12
13
14
15
16
17
18
19
20
21
22
23
24
25
26
27
28
29
30
31
32
33
34
35
36
37
38
39
40spring:
datasource:
druid:
url: jdbc:mysql://localhost:3306/life?useUnicode=true&characterEncoding=utf8
username: root
password: 123456789
#WebStatFilter
web-stat-filter:
enabled: true
profile-enable: true
url-pattern: /*
#StatViewServlet
stat-view-servlet:
enabled: true
initial-size: 1
min-idle: 3
max-active: 20
#配置获取连接等待超时时间
max-wait: 60000
#配置间隔多久才进行一次检测,检测需要关闭的空闲连接,单位是毫秒
time-between-eviction-runs-millis: 60000
# 配置一个连接在池中最小生存的时间,单位是毫秒
min-evictable-idle-time-millis: 30000
#让连接池知道数据库已经断开了,并且自动测试连接查询
validation-query: select 'x'
test-while-idle: true
test-on-borrow: false
test-on-return: false
filter:
stat:
enabled: true
#开启慢查询
log-slow-sql: true
slow-sql-millis: 2000
#合并sql
merge-sql: true
wall:
enabled: true
更多的配置详情请访问https://github.com/alibaba/druid/。
druid测试
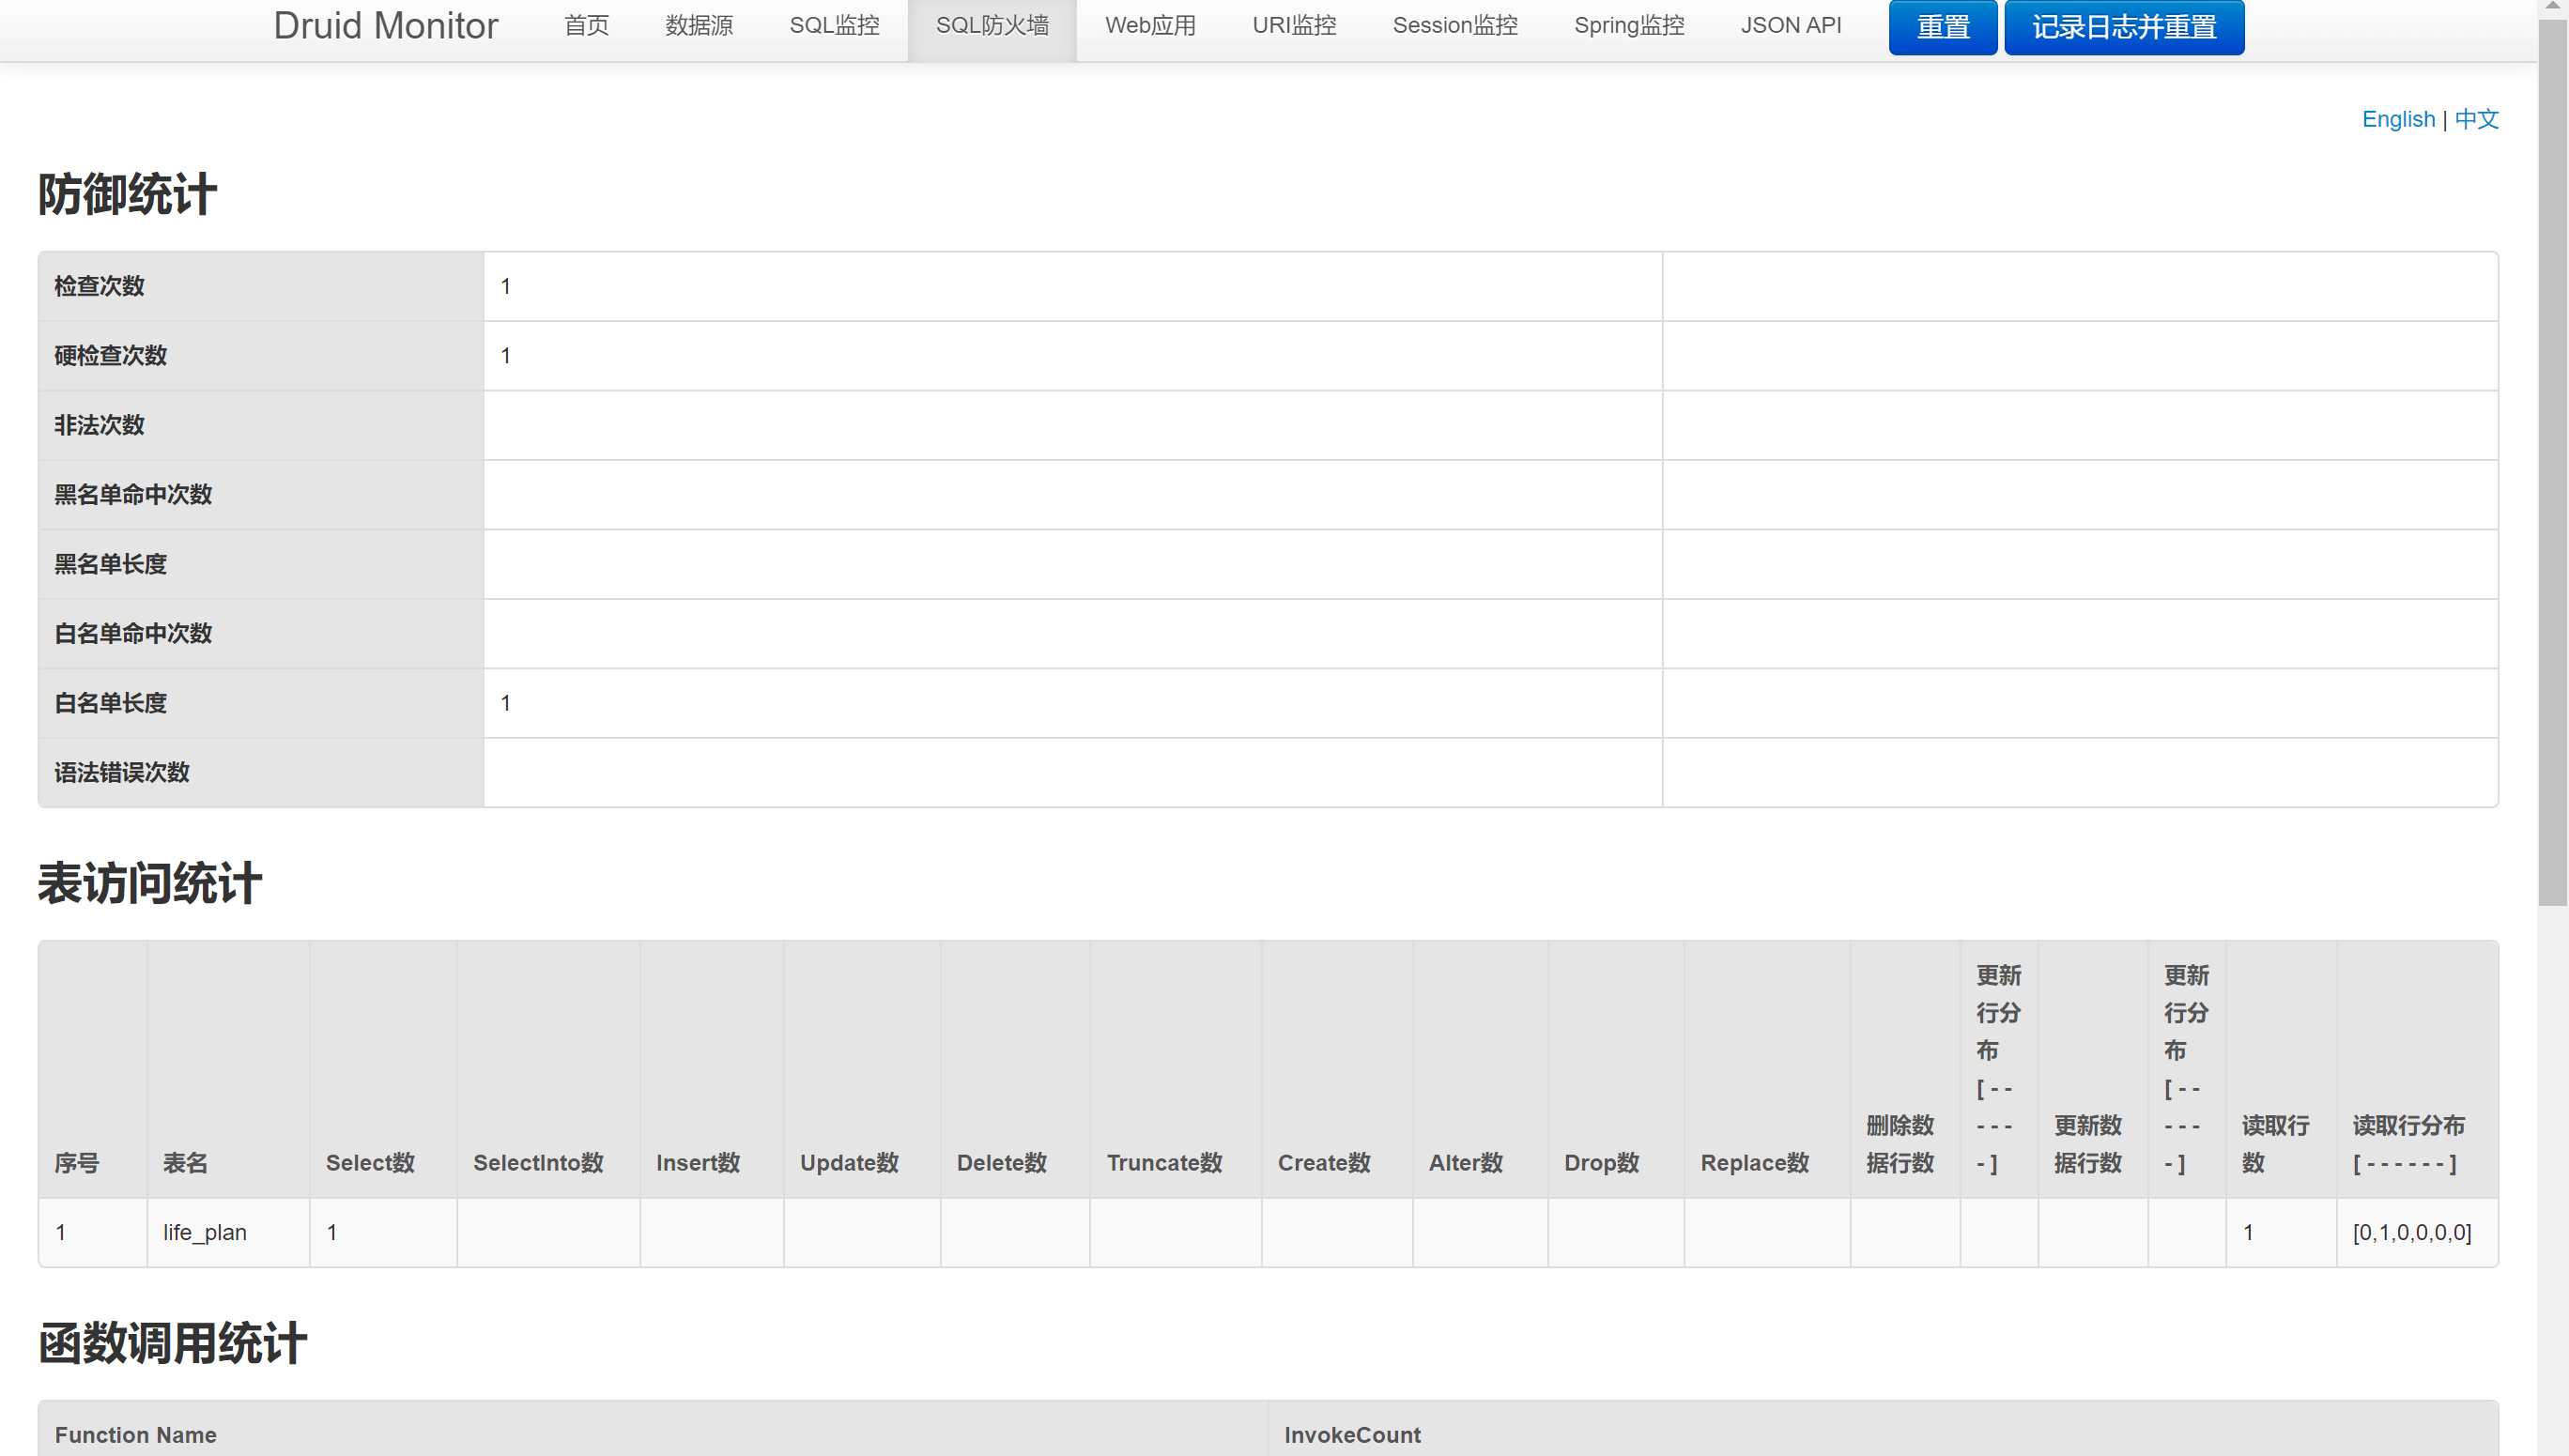
启动服务,访问http://localhost:8080/druid/index.html。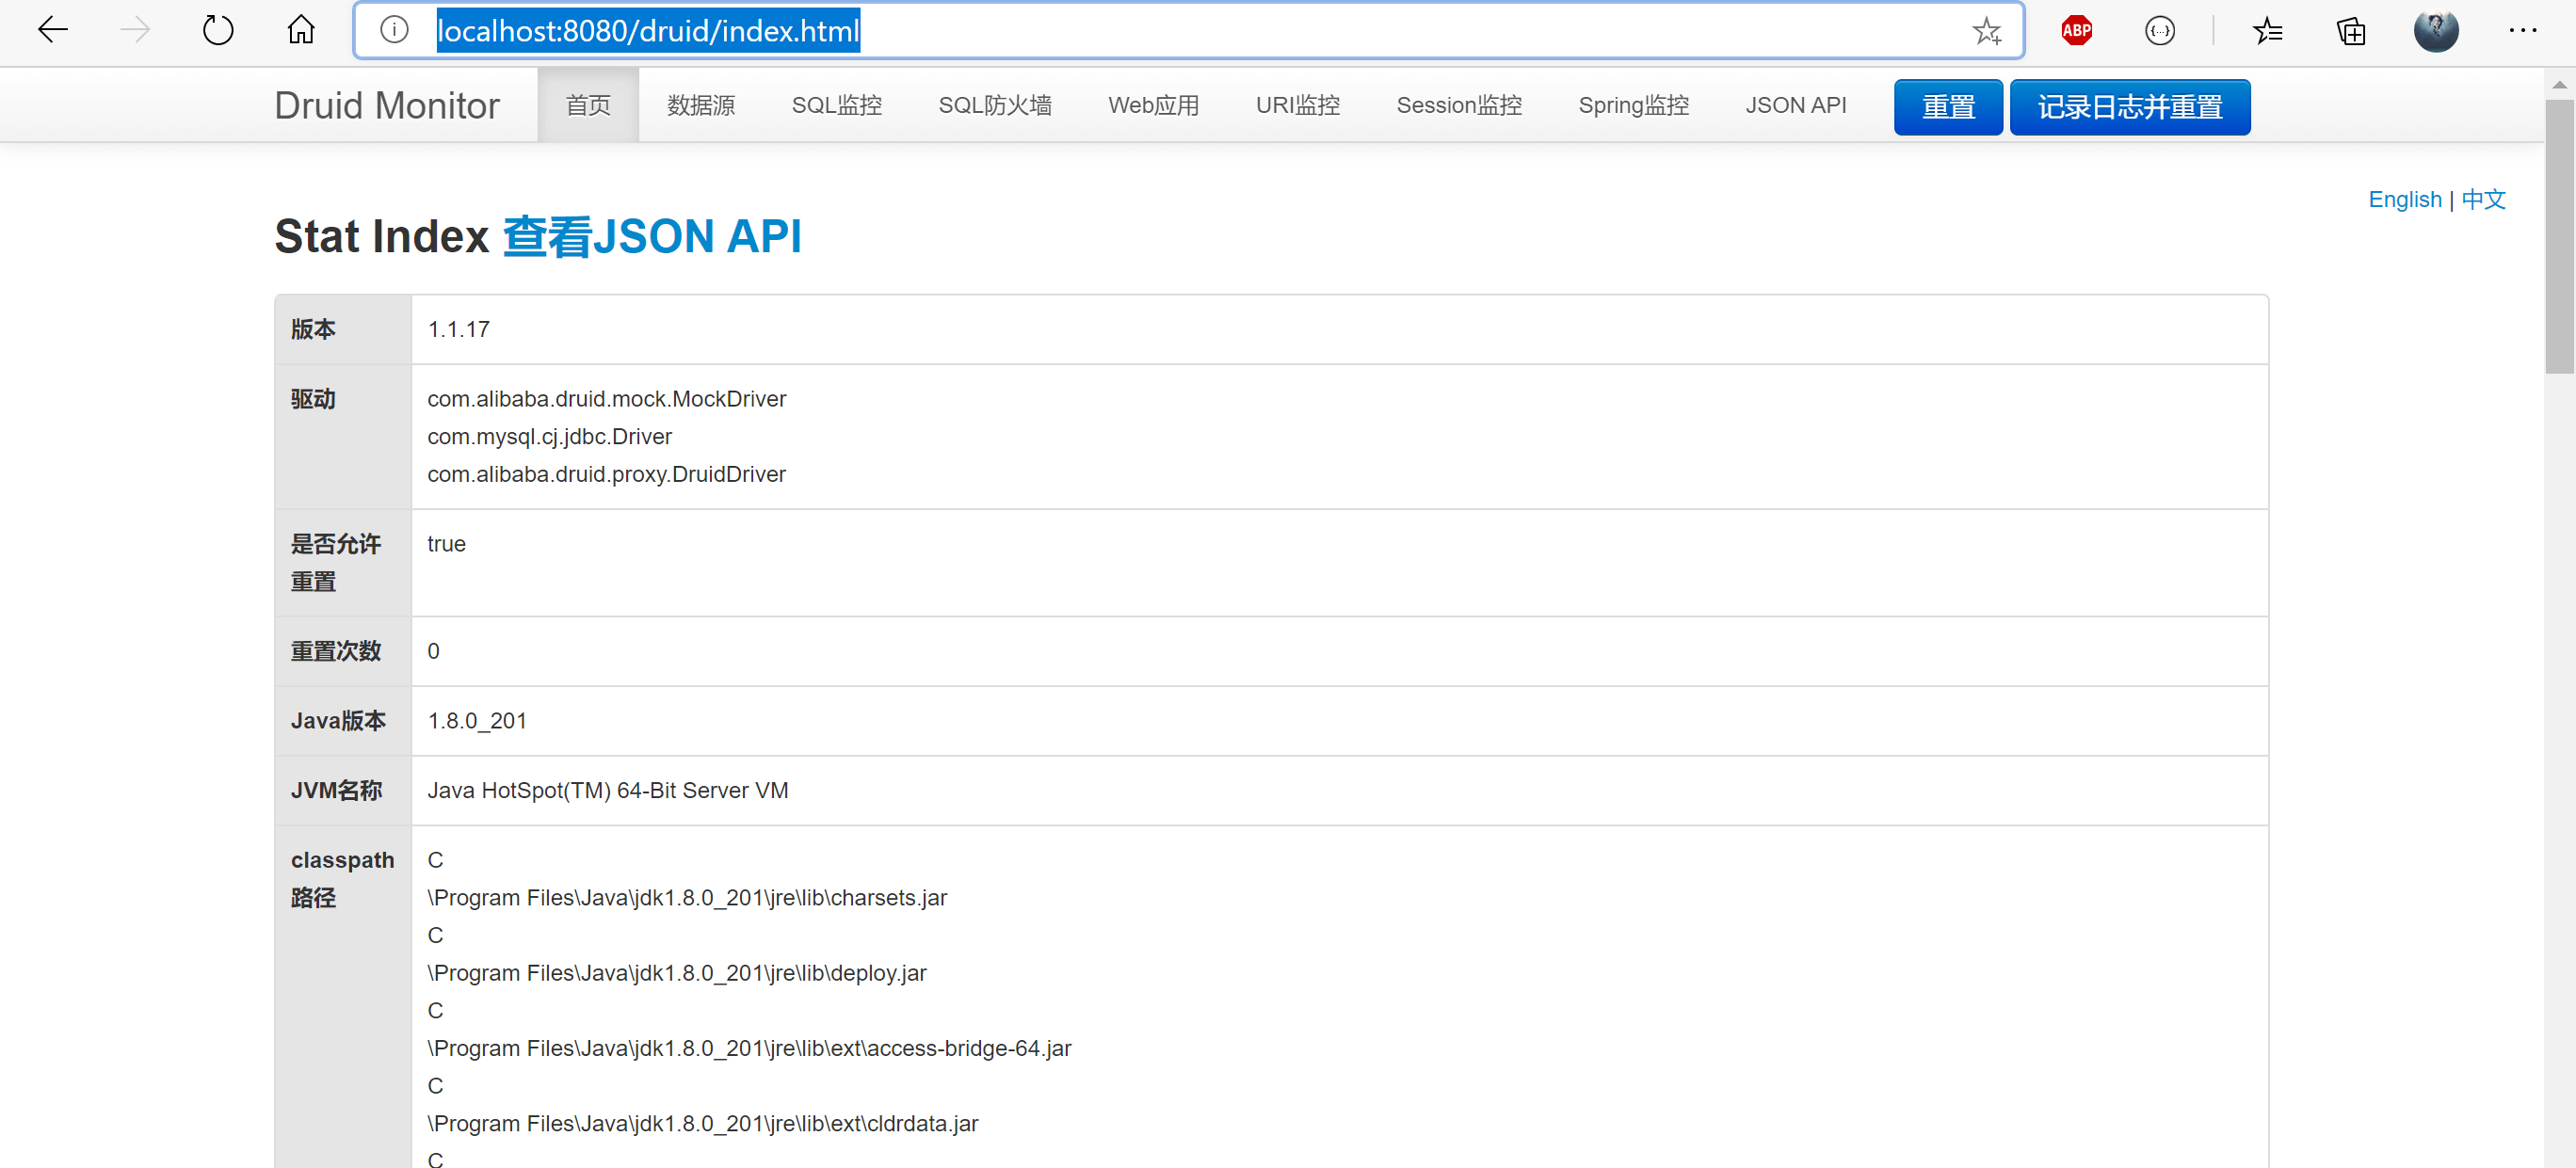
mybaits
配置修改
在application.yml添加1
2
3
4
5
6mybatis:
#扫描mapper.xml路径
mapper-locations: /mybatis/**/*.xml
configuration:
#开启驼峰原则
map-underscore-to-camel-case: true
在启动类GuaiApplication.java添加注解@MapperScan("com.guai.*.dao")开启扫描。
测试
测试sql使用注解的形式,之后将会写在xml文件中。
在com.guai.system.dao下创建TestDAO.java,其中表life_plan可以换成自己库里其他随意一张表。1
2
3
4
5
public interface TestDAO {
("select count(*) from life_plan")
public int select();
}
修改TestController.java。1
2
3
4
5
6
7
8
9
10
11public class TestController {
private TestDAO testDAO;
...
("mybatis")
public R mybatis(){
return R.ok(testDAO.select());
}
}
启动服务访问接口http://localhost:8080/mybatis。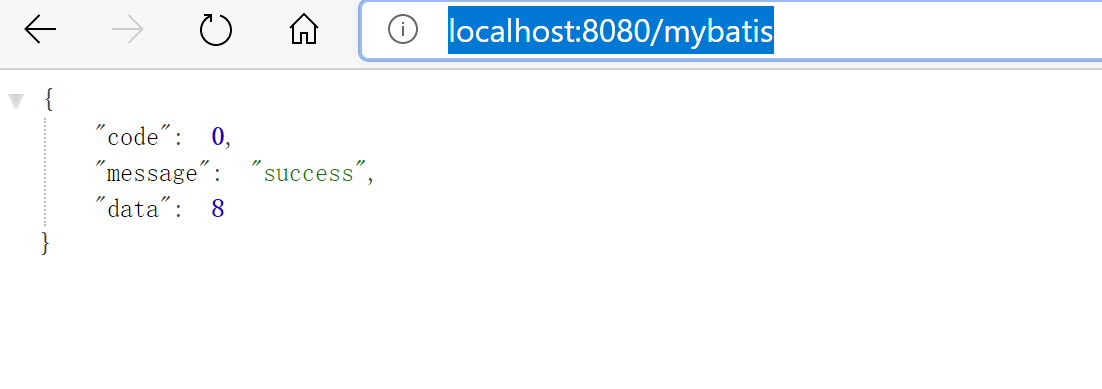
此时再去访问druid的监控网址,进入SQL监控和SQL防火墙已经有了数据。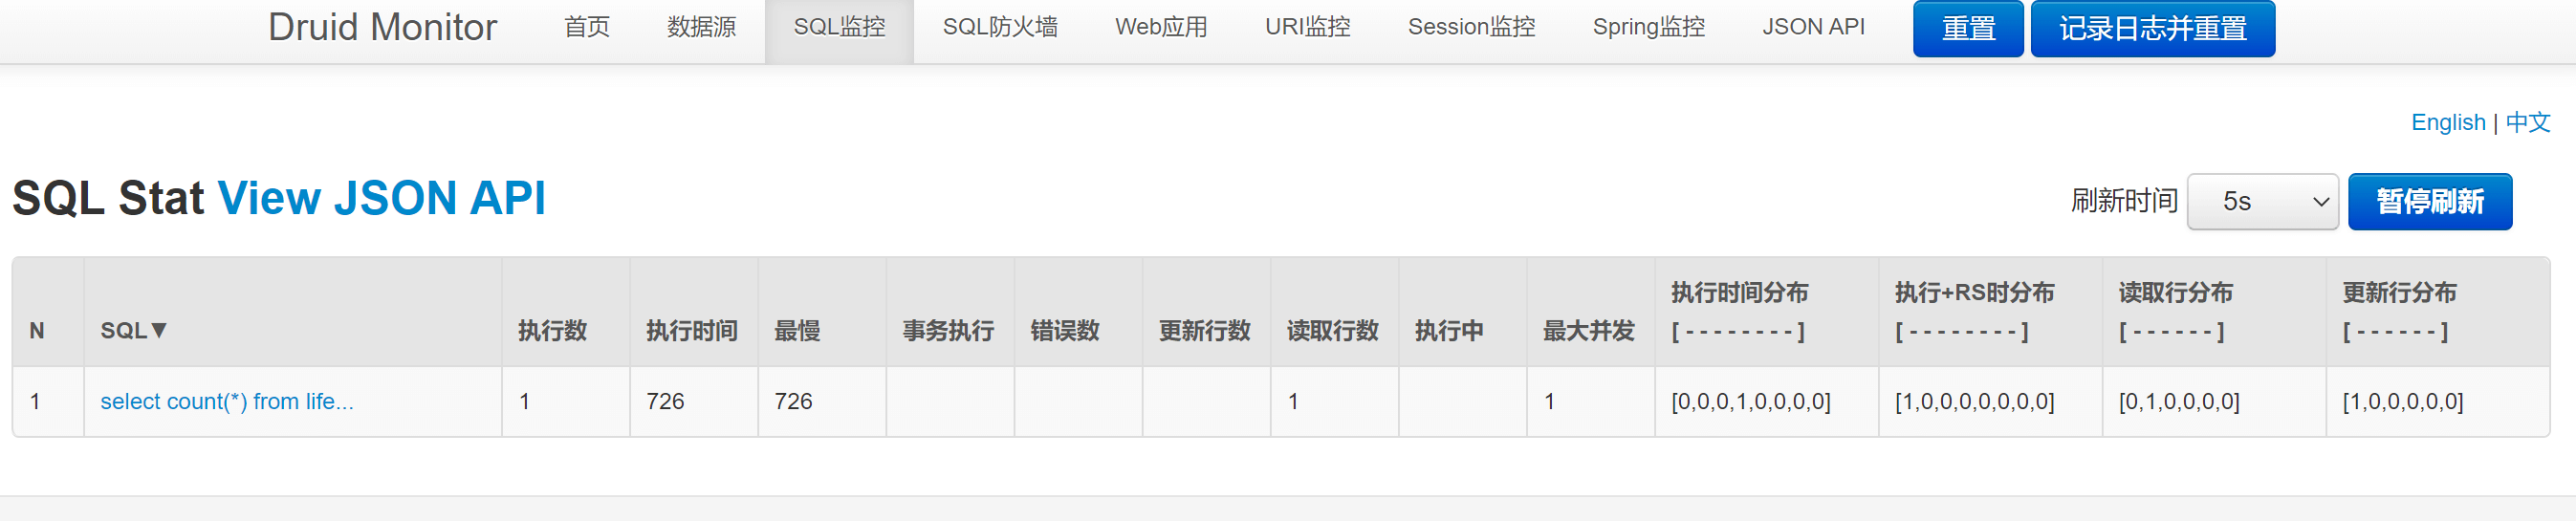
本章结语
本章感觉乱乱的。下章开始安全管理框架的配置。